
Build a Truly Portable Python Dev Environment with VS Code Dev Containers (macOS/Windows/Linux)
Want a Python project you can open on any computer and get the exact same environment—no Conda, no system Python, no “works on my machine”? This guide shows you how to create a portable, reproducible template using Docker + VS Code Dev Containers. Copy these files into any repo, hit Reopen in Container, and you’re ready to code.
What you’ll get
- One template that runs identically on macOS, Windows (WSL2), and Linux.
- Clean, isolated Python (3.11 by default) with Jupyter, Black, etc.
- One-command bootstrap on new machines—no local Python needed.
- Optional add-ons: TensorFlow (CPU), Postgres/Redis/MLflow via
docker-compose.
TL;DR (copy–paste starter)
Create this folder layout:
your-project/
├─ .devcontainer/
│  ├─ devcontainer.json
│  ├─ Dockerfile
│  └─ postCreate.sh
├─ .dockerignore
├─ .gitattributes
├─ requirements.txt
├─ src/
│  └─ app.py
└─ Makefile
.devcontainer/devcontainer.json
{
  "name": "py-dev",
  "build": {
    "dockerfile": "Dockerfile",
    "context": "..",
    "args": { "PYTHON_VERSION": "3.11" }
  },
  "workspaceFolder": "/workspace",
  "remoteUser": "vscode",
  "settings": {
    "python.defaultInterpreterPath": "/usr/local/bin/python",
    "terminal.integrated.defaultProfile.linux": "bash"
  },
  "extensions": [
    "ms-python.python",
    "ms-python.vscode-pylance",
    "ms-python.black-formatter",
    "ms-toolsai.jupyter",
    "ms-azuretools.vscode-docker"
  ],
  "postCreateCommand": "bash /setup/postCreate.sh",
  "forwardPorts": [8888, 8000, 5000],
  "mounts": [
    "type=volume,source=pip-cache,target=/home/vscode/.cache/pip"
  ]
}
.devcontainer/Dockerfile
# syntax=docker/dockerfile:1
ARG PYTHON_VERSION=3.11
FROM mcr.microsoft.com/devcontainers/python:${PYTHON_VERSION}

# Optional: add OS deps you need
# RUN apt-get update && apt-get install -y --no-install-recommends \
#     libgl1-mesa-glx ffmpeg && rm -rf /var/lib/apt/lists/*

# Copy setup script into the image (fixes Windows CRLF/exec bit issues)
COPY postCreate.sh /setup/postCreate.sh
RUN chmod +x /setup/postCreate.sh

WORKDIR /workspace
.devcontainer/postCreate.sh
#!/usr/bin/env bash
set -euo pipefail
cd /workspace

python -m pip install -U pip

# Install project deps (if present)
if [ -f requirements.txt ]; then
  pip install -r requirements.txt
fi

# Register a Jupyter kernel for this env
python -m ipykernel install --user --name "py-dev" --display-name "Python (py-dev)" || true

echo "[postCreate] Environment ready."
requirements.txt
jupyterlab
ipykernel
numpy
pandas
matplotlib
black
Need TensorFlow (CPU)? Add: tensorflow==2.16.*.dockerignore
.git
**/__pycache__/
**/.pytest_cache/
**/.ipynb_checkpoints/
.env
*.log
.gitattributes
# Ensure LF endings for scripts/configs (prevents ^M issues on Windows)
*.sh          text eol=lf
Dockerfile*   text eol=lf
*.json        text eol=lf
*.yml         text eol=lf
*.yaml        text eol=lf
*.py          text eol=lf
src/app.py
print("Hello from Dev Container!")
Makefile (optional, handy shortcuts)
.PHONY: build bash jupyter test

build:
	@echo "Use VS Code: Dev Containers → Rebuild and Reopen in Container"

bash:
	docker ps --format '{{.Names}}' | grep 'vsc-' -m1 | xargs -I {} docker exec -it {} bash

jupyter:
	docker ps --format '{{.Names}}' | grep 'vsc-' -m1 | xargs -I {} docker exec -it {} \
	jupyter lab --ip=0.0.0.0 --no-browser --NotebookApp.token=''

test:
	pytest -q
Step-by-step: how to use this template
- Install prerequisites
- Docker Desktop
- macOS: default
- Windows: enable WSL2 and check “Use the WSL 2 based engine”
- VS Code + the Dev Containers extension
- Optional: Git
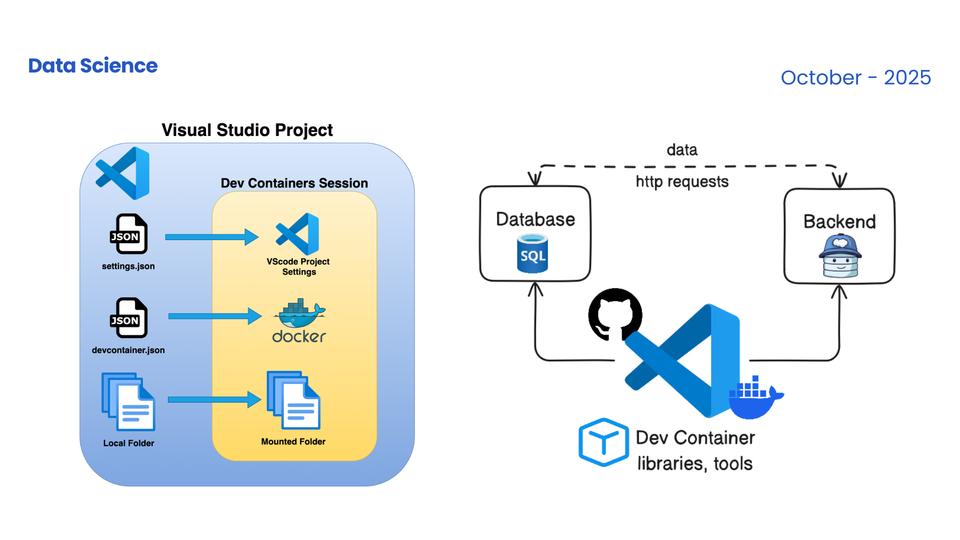
- Open your project folder in VS Code
- Command Palette → Dev Containers: Rebuild and Reopen in Container
VS Code will build the image, start the container, mount your workspace at /workspace, install Python deps from requirements.txt, and register a Jupyter kernel.
- Sanity checks
whoami && python -V
python src/app.py
pip list | head
jupyter lab --ip=0.0.0.0 --no-browser   # open via forwarded port 8888
Why this is portable (and headache-free)
- No system Python: the container image carries Python + tools.
- Reproducible:
Dockerfile+requirements.txtdefine the full environment. - Cross-platform: VS Code Dev Containers abstracts host differences (macOS/Windows/Linux).
- Fast: cache pip downloads to a Docker volume across rebuilds.
- CRLF-safe:
.gitattributesforces LF, script runs identically on all OSes.
Optional: add TensorFlow (CPU)
You have two clean options:
A) Keep your image, install TF via requirements.txt
Add to requirements.txt:
tensorflow==2.16.*
Then Rebuild and Reopen in Container. Verify:
python -c "import tensorflow as tf; print(tf.__version__); print(tf.reduce_sum(tf.random.normal([128,128])))"
B) Base on TensorFlow images
Swap the base image in Dockerfile:
FROM tensorflow/tensorflow:2.16.1 # or :2.16.1-jupyter
Note: On macOS containers, CUDA/GPU is not available. For NVIDIA GPUs on Linux/Windows WSL2, use CUDA images and run with --gpus all.Optional: bring databases and services with docker-compose
Create docker-compose.yml in the project root:
version: "3.9"
services:
  dev:
    build:
      context: .
      dockerfile: .devcontainer/Dockerfile
      args: { PYTHON_VERSION: "3.11" }
    user: "1000:1000"
    volumes:
      - ./:/workspace:cached
      - pip-cache:/home/vscode/.cache/pip
    working_dir: /workspace
    environment:
      - DATABASE_URL=postgresql://postgres:postgres@db:5432/app
    ports:
      - "8888:8888"
      - "8000:8000"
      - "5000:5000"
    depends_on: [db]

  db:
    image: postgres:16
    environment:
      POSTGRES_PASSWORD: postgres
      POSTGRES_DB: app
    volumes:
      - dbdata:/var/lib/postgresql/data
    ports:
      - "5432:5432"

volumes:
  pip-cache:
  dbdata:
Then change devcontainer.json to compose mode:
"dockerComposeFile": "../docker-compose.yml",
"service": "dev",
"workspaceFolder": "/workspace"
Reopen in Container and you’ll have Python + Postgres running together.
Team workflow tips
- Keep it minimal: only include libs you actually use.
- One env per repo: every project gets its own
.devcontainer/.
Pin versions: when your environment stabilizes, freeze them:
pip freeze > requirements.txt
Troubleshooting
- “^M: bad interpreter”
Your script has Windows CRLF line endings. Fix with.gitattributes(provided) and ensure files use LF (VS Code status bar → “CRLF/LF”). - Permissions on Windows
Windows doesn’t preserve+xbits. We copy the script into the image andchmod +xinDockerfileto make it executable—no extra steps needed. - macOS file I/O performance
You already use a bind mount for the workspace. Heavy data can live in Docker volumes for better performance if needed.
GPU (Linux/WSL2 + NVIDIA)
Install NVIDIA drivers + CUDA toolkit, enable Docker’s GPU support, use CUDA-enabled base images, and add:
"runArgs": ["--gpus","all"]
Proxy / corporate network
If you’re behind a proxy, set it in Docker Desktop or pass env vars in devcontainer.json:
"containerEnv": {
  "HTTP_PROXY": "http://host.docker.internal:3128",
  "HTTPS_PROXY": "http://host.docker.internal:3128",
  "NO_PROXY": "localhost,127.0.0.1,host.docker.internal"
}
Final checklist (for new machines)
- Install Docker Desktop, VS Code, Dev Containers extension
- Clone your repo
- Dev Containers: Rebuild and Reopen in Container
- Run
python -Vandjupyter lab --ip=0.0.0.0 --no-browser - Start building 🚀
If you want a “batteries-included” variant (Python + Jupyter + FastAPI + Postgres + MLflow) as a ready-to-use template, you can extend this in minutes with the docker-compose example above. Happy shipping!
下面是一份干净卸载 Dev Container 环境的实操清单——既能把正在运行的容器停掉,也会清掉对应镜像、卷(比如 pip-cache/dbdata)、网络与构建缓存。你的项目代码本身不会被删除。
0) 先关 VS Code 的容器会话
- 在 VS Code / Cursor 里关闭该项目(或 Command Palette → “Dev Containers: Close Remote Connection”)。
- 这样可以避免“文件被占用”。
1) 删除与该项目相关的容器
在项目根目录执行(macOS/Linux 的终端,或 Windows 的 PowerShell 也可用这些 docker 命令):
# 列出当前项目的 Dev Container(按标签过滤)
docker ps -a --filter "label=devcontainer.local_folder=$(pwd)" --format "table {{.ID}}\t{{.Names}}\t{{.Status}}"

# 强制删除匹配到的容器(如果有)
docker ps -a --filter "label=devcontainer.local_folder=$(pwd)" -q | xargs -r docker rm -f
如果你是用docker-compose跑的(我给的可选方案 B):
在项目根执行:
这一步会顺带删除 compose 里声明的命名卷(如dbdata)。
2) 删除该项目的镜像
Dev Containers 常见镜像名以 vsc- 开头(例如 vsc-your-project-<hash>),也可能是你 Dockerfile 构建出来的名字。
# 列出本地镜像,找 vsc- 开头的
docker images --format "table {{.Repository}}\t{{.Tag}}\t{{.ID}}" | grep '^vsc-' || true

# 删除所有 vsc- 开头的镜像
docker images --format '{{.Repository}} {{.ID}}' | awk '/^vsc-/{print $2}' | xargs -r docker rmi -f
如果你是用拉取的基础镜像(如 mcr.microsoft.com/devcontainers/python 或 tensorflow/tensorflow),想一起清:
docker images --format '{{.Repository}}:{{.Tag}} {{.ID}}' | \
grep -E 'mcr\.microsoft\.com/devcontainers/python|tensorflow/tensorflow' | \
awk '{print $2}' | xargs -r docker rmi -f
(不删也行,保留能加速下次使用。)
3) 删除缓存卷(pip/uv 等)
如果你在 devcontainer.json 里用了我建议的缓存卷,比如 pip-cache、uv-cache、以及数据库卷 dbdata,可以这样清:
# 查看可能的卷
docker volume ls

# 删除常用命名卷(存在才会删)
docker volume rm pip-cache 2>/dev/null || true
docker volume rm uv-cache  2>/dev/null || true
docker volume rm dbdata    2>/dev/null || true
不确定卷名时可以:
4) 删除为该项目创建的网络(可选)
docker-compose 通常会创建形如 <文件夹名>_default 的网络:
docker network ls --format "table {{.Name}}\t{{.ID}}" | grep -i "$(basename $(pwd))" || true
# 例如:
# docker network rm your-project_default
5) 清理构建缓存与悬空镜像(可选但建议)
# 清理 BuildKit 构建缓存(不影响业务镜像)
docker builder prune -af

# 删除悬空镜像/层(<none>:<none> 之类)
docker image prune -af

# 删除未使用的卷(谨慎,会删掉所有“未被容器使用”的卷)
docker volume prune -f
6)(可选)移除项目中的 Dev Container 配置
不再需要 Dev Containers 了,可直接删除项目里的这些文件/目录(只影响这个仓库本身):
.devcontainer/
.dockerignore
.gitattributes
requirements.txt   # 如果你确定不要了
7)(最后手段)全局大扫除
如果你想把 Docker Desktop 里的所有内容都清掉:
- Docker Desktop → Troubleshoot → Clean / Purge data(会删除本机所有镜像/容器/卷/网络,谨慎)。
或命令行:
docker system prune -af --volumes
一键脚本(在项目根执行,专清“当前项目”)
# ---- Danger: 仅删除当前项目相关容器/镜像/卷;请在项目根执行 ----
set -e

# 1) 删容器(按 devcontainer 标签)
docker ps -a --filter "label=devcontainer.local_folder=$(pwd)" -q | xargs -r docker rm -f

# 2) 删 vsc- 项目镜像
docker images --format '{{.Repository}} {{.ID}}' | awk '/^vsc-/{print $2}' | xargs -r docker rmi -f

# 3) 删常见命名卷(按需添加你的卷名)
for v in pip-cache uv-cache dbdata; do
  docker volume rm "$v" 2>/dev/null || true
done

# 4) 清构建缓存与悬空镜像
docker builder prune -af
docker image prune -af

echo "✅ Dev Container environment for this project has been cleaned."
常见问答
- Q: 我只想删容器,保留镜像和卷?
A: 只做第 1 步即可。 - Q: 我用的是
docker-compose,如何一步清理?
A: 项目根执行docker compose down -v会清掉容器与命名卷;再手动docker image prune -af清悬空镜像。 - Q: 会不会删掉我的代码?
A: 不会。上面步骤仅操作 Docker 的容器/镜像/卷/网络。你的项目文件夹不会被删除。
需要的话,我可以把上述“一键清理脚本”放到你的仓库,比如 scripts/clean_devcontainer.sh,并在 Makefile 里加个 make clean 目标,日常用起来更顺手。